02 December 2013

TOMS shoes One for One

I just bought my first pair of shoes from TOMS and I can tell they won't be my last.  As soon as I put them on they felt unlike any other pair of shoes I've had before and I liked them quite a lot.  But what drew me to TOMS was their "One for One" program.  For every pair of shoes you buy, they give a pair to a child who doesn't have shoes.  As a veterinarian the first thing that came to my mind was preventing hookworm by wearing shoes!  But a pair of shoes can have other health impacts, boost self-esteem and shoes are often required to attend school.  It's a huge win-win situation.  When you find that you need some new kicks, I highly recommend TOMS.  They ship internationally for quite a low fee, just a tiny bit above what I've spent on regular domestic shipping in the past.


To find out more about TOMS, check out their "Get Involved" page, or watch the short documentary on YouTube.

06 November 2013

shop ethical! app

I noticed the Shop Ethical! guide for sale at my church one week and thought I would check it out.  However, I chose to get the phone app because it was likely that I would forget to bring the guide with me when out shopping.  It doesn't cost much and puts a wealth of collated information at your fingertips.  Basically this is informed consumerism at its best.  The guide presents information about a company and you see how it lines up with your values.  Perhaps you want to make sure that workers get a fair wage or maybe you're more focused on the environment--this app will let you know how companies/retailers are performing and you can make your decisions accordingly.  I have found it quite useful when I'm choosing between two products.  A quick look at the guide and I often find out things I would have never known about certain companies, and it really helps my decision making.

It seems to be that their clothing edition is only online for now.  I'm looking forward to seeing that in app version.  I honestly cannot look at a low price on clothing these days and not think about who is getting ripped off in the supply chain, or picture the scenes from the fire in the clothing factory in Bangladesh.  This guide is perfect for exposing all the things that aren't on the label.

16 October 2013

diapers part 2

With child number 2 we made the move to cloth diapers.  Using the gdiaper system we already had, we simply purchased cloth inserts from CottonWood Baby.  I ordered these from the USA and my parents brought them to us when they visited after the birth.  I'm sure we could have made our own, but I didn't know the first thing about which type of material to use.  These inserts have a microfleece side touching the skin with organic hemp/cotton layers underneath for absorption.  We have had no diaper rashes at all, few leaks onto the outer cover, and they are quite absorbent.  The leaks were all due to using those old liners that I had handwashed.  This is how I learned that not following the exact washing instructions causes the elastic to break down prematurely, therefore not providing an effective edge barrier at all.


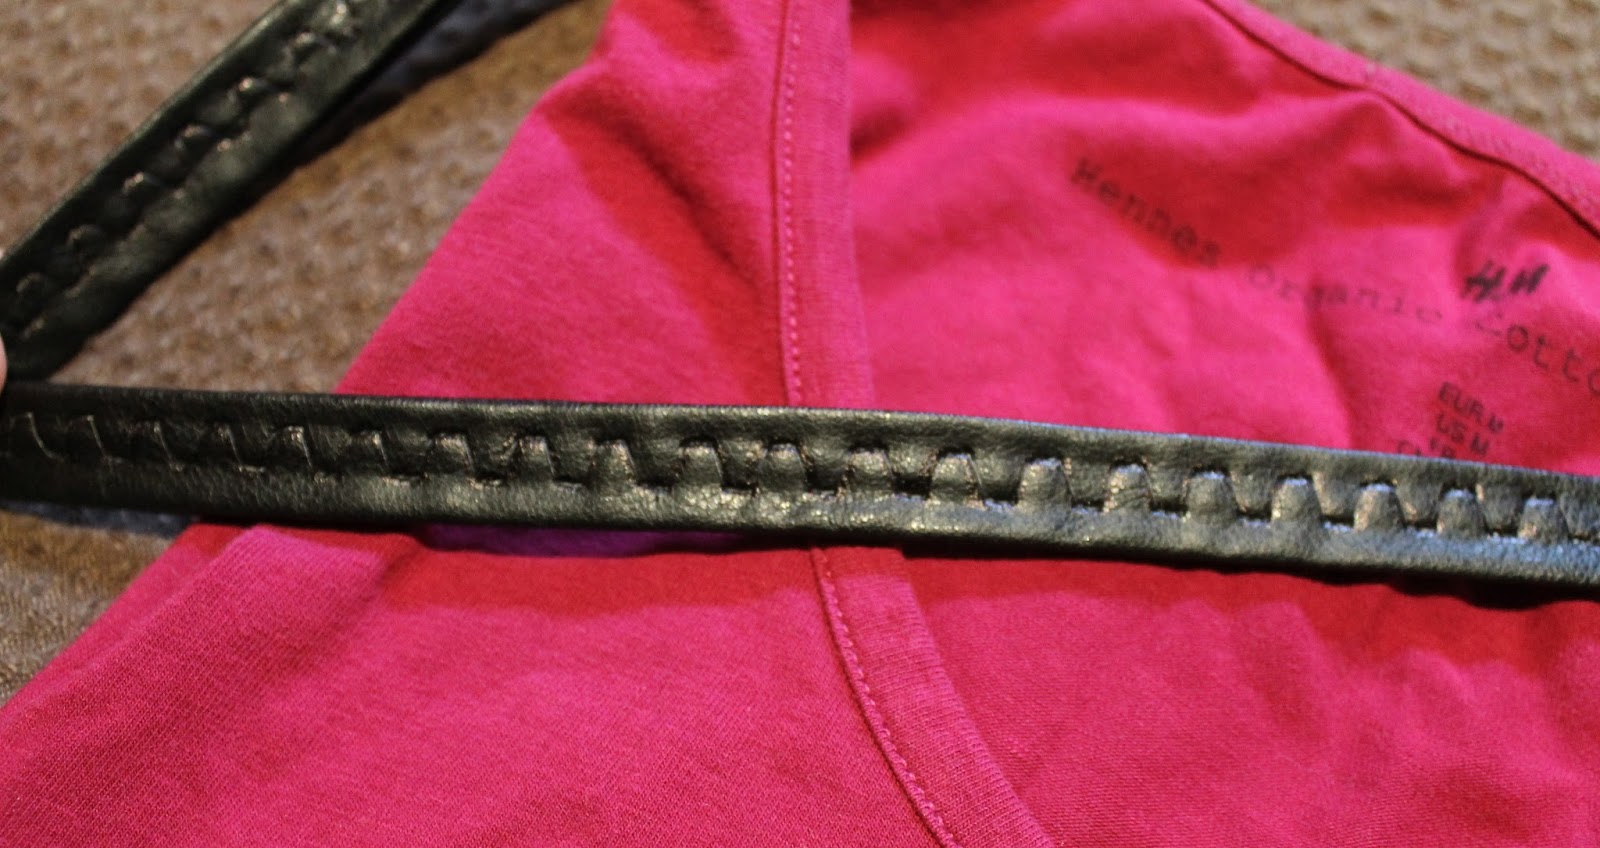
Note all the cracks along the elastic


Replacement was a little bit difficult, but achievable.  Perhaps the most complicated component of using this system is the fact that gdiaper products are not available in Australia.  Of course this means huge shipping costs from the US, if you can find a supplier that is willing to ship to Australia.  Fortunately, the Australian eenee system is completely interchangeable.  I bought a few new covers from them and they have lasted very well.  The gdiaper brand liners and much more cheap than the ones from eenee, so it was more cost-effective to have those sent from the USA.  I had to have them sent to a friend who could mail them to me, but they weigh next to nothing so shipping was very cheap.

System with cloth insert, eenee diaper covers


I admit that we have not used this system overnight.  We tried once, by putting two inserts in, and it was successful.  However the diaper was so bulky that bubs didn't seem comfortable.  Instead we have used Naty (Nature Babycare) biodegradable disposables and not had any issue with them.  They are not 100% biodegradable, but they are definitely a step in the right direction.  I'm hoping to invest in some all-in-one cloth diapers specifically for overnight.

But I know what you really want to hear about--the laundry and cleaning up!  After looking at the options, I picked a dry pail system.  We have a bucket in our laundry room and everything just gets thrown in there until washing time.  I wash every other day.  When we had breast milk-only poo (read=sloppy, unformed), I didn't bother trying to get the poo off the insert.  Once bubs hit 6 months and started having formed poo, I started flushing it down the toilet before throwing the insert in the bucket.  Don't get me wrong, sometimes the poo isn't a nice little nugget.  Usually just folding the insert a bit molds it into something easier to get into the toilet.  Think play dough...  Yuck?  Yes.  But honestly it's not that bad.  If there's little hope I'll get it into the toilet easily, I don't bother.  I've found out that it's amazing what a washing machine can do.  First I do either a short wash cycle, or just the rinse cycle, depending on how soiled the inserts are.  Then I run the full wash on hot, using about half as much soap as you would normally need for clothes washing.  I let everything air dry: if outside then it's done in a few hours, if inside in winter then the covers dry overnight but the inserts take closer to 24 hours.

It's never too late to switch to a cloth system, and I would recommend it.  It's definitely nowhere near as scary or smelly as I had expected it to be!

11 September 2013

diapers part 1

I'm going to tell you about my adventures with trying to make eco-conscious decisions in diapering my children.  It's not going to be pretty because we are basically going to be talking about poop.  I will cover everything else, but I think the unknown of "what happens when they poop" is what can hold a lot of people back from using non-disposables.

When I was living in the USA and pregnant with child number 1, preparing for the impending arrival included choosing a diapering system.  Before doing any research, I had a couple preconceived ideas about diapers:
1. Cloth= I could remember from my childhood the cloth diaper service that my parents used for my brother.  I only have memories of a very stinky diaper pail and pointy diaper pins.  I don't really remember the service coming to collect the diapers, only that the pail was huge and smelly.
2. Disposables= The first thing that came to mind was an image of the diapers stacking all the way to the moon and back, never to degrade.  I think that picture was one of the first things they showed us in the late 80's at school when we started learning about reuse, reduce and recycle.

To help me decide, I actually set about calculating the costs.  Unfortunately we lived in an apartment complex with coin laundry, so that increased my costs quite a lot.  Cloth diapers were not going to save me any money, but they would be an investment in our environment.  However, I didn't go the cloth route because I discovered gdiapers.

Waterproof liner snaps in to cloth diaper cover, flushable insert will go into liner.
This is my oldest diaper cover (2 kids and 5 years) so note the curled velcro and pilling. 

gdiapers use cloth covers over waterproof liners that hold a flushable insert.  Flushable diapers!  I thought it must be too good to be true, but I was impressed that the inserts really did flush.  I found gdiapers just as absorbable as disposables, and didn't require much washing.  The diaper covers rarely got soiled.  The liners didn't get soiled too often and they dry incredibly quickly.  I chose to handwash the liners in a bucket in the tub, then hang them over the shower rod.  Apparently handwashing can cause the elastic to wear down more quickly, but I didn't notice much issue with the elastics until I used cloth inserts (so different inserts and quite a long time later).

Flushing the inserts never was too much of a problem for me.  You are meant to tear the insert so the pulp in the middle can fall into the toilet, then give it all a swish with a special stick they give you, and flush.  I found that I wasn't too keen on dealing with the inserts that had been pooped on, but you have the option not to flush.  The inserts biodegrade, so you can always just throw them away!

A gdiaper in action, pretty cute
The hubby also did a good job with these, which for us is a sign of a convenient system.  We were gifted the starter kit, then just got new cute covers when they were on sale.  diapers.com seemed to have pretty good prices for shipping new inserts, but usually I picked them up at Whole Foods.  There are also forums online where people sell and trade their gdiaper equipment, some getting really crafty and embellishing the covers.

Unfortunately when our child was 7 or 8 months old he developed a rash which would only get better if he was out of the gdiapers.  We tried to get him back in the gdiapers repeatedly after the rash would clear, but even after only 20 minutes in a dry diaper the bumps would start appearing.  We were bummed to stop using them, but saved all our equipment for child 2.  In part 2 of the diaper blog I'll cover how we were able to convert the gdiaper system into a cloth one.

26 August 2013

t-shirt quilt

All of my upcycling projects culminated in this pièce de résistance...the t-shirt quilt.  It took me months to make, mainly because I had no clue what I was doing, but I'm quite proud of the finished product.


When I say I didn't know what I was doing, I mean I had never quilted before or even really watched anyone make a quilt.  I kept thinking that at some point my inexperience would cause me to make a fatal error, but surprisingly everything worked out well.  The main flaws that exist are due to the fact that I was working with jersey which can be a bit annoying.  ecokaren blogged about her t-shirt quilt, and her tip to apply interfacing to the t-shirt material was a lifesaver.  Besides that I learned the quilting basics from a library book, and used pretty prudent's quilt binding cheat to finish the edges.

Binding cheat = fold over the backing
In summary, I would encourage anyone to try this project.  It's a great way to keep your special t-shirts! I was able to do all this with my sewing machine without purchasing a quilting foot.  The interfacing made all the difference in the world, and having a bit of experience with sending jersey through the sewing machine before did help--it's good to understand your fabric.

14 August 2013

pochette from a shirt

So this quick project was another pinterest find, linking to a youtube tutorial on how to make a t-shirt pochette (not an envelope-style purse, but a "little pocket").  My advice is to watch the video on mute...the music isn't too great.  While this bag is simple enough that a few pictures could have relayed the instructions, it's sometimes nice just to watch someone crafting on youtube.  

Simple flowers for embellishment
I wanted to make more of a proper handbag handle and just had to experiment a bit with making one.  They do sell handles at craft stores for those people who make their own purses, but they would have looked too serious at the top of this casual bag.  After a couple trials I ended up with a a simple decorative stitch to bind some fake leather from the trims section and I'm pretty happy with the look.


24 July 2013

sustainable seafood guide

During my masters course I had to do a report on the current state of a fishery, the laws and regulations associated with it, and how stocks were monitored.  Let me tell you, reading about overfishing is depressing.  There are many problems ranging from fishing techniques to the enforcement of regulations.  Fish numbers are depleted while the laborious and time-consuming task of finding sustainable fishery solutions is underway.

Choosing sustainable seafood can be rather difficult.  One approach is to look for the "certified sustainable seafood" label, endorsed by the Marine Stewardship Council.  Their website has data on sustainable fisheries around the world.  My strategy?  I downloaded Australia's Sustainable Seafood Guide from the Australian Marine Conservation Society.  I can just search by the name of the fish and results pop up on whether this fish is a "say no", "think twice" or "better choice".  Details of why they have arrived at that conclusion are listed.  It's all about being a better-informed consumer!  Another easy thing to do is to shop at Aldi, who have an initiative to support sustainable fishing practices.

10 July 2013

soft plastics

Did you know that most types of plastics, including plastic bags, are recyclable?  The only problem is that not everything that's recyclable can get thrown into your recycle bin for weekly pick up.  RED group is "rethinking recycling" and the list of plastic products they recycle is impressive.  There isn't a heap more effort that needs to be put in since they have collection bins at Coles stores.  We have just put a box in the laundry room and collect things in there.  It actually takes ages to accumulate enough for drop-off, so the biggest change is in our behaviour.  I admit that it's pretty easy to remember to save the bread bags, but I often have to remind myself that frozen food and confectionary packaging can be recycled.  Between eliminating food and plastic waste, our bin is much less full.  I suspect if we look closer at what else we throw away we will probably find some other ways we can reduce our waste.

25 June 2013

recycled t-shirt bunny

For Christmas I made my niece and my daughter, who were 9 months and 6 months respectively, soft bunny toys.  As I had just started this blog, I didn't have the forethought to take a photo of the two cute bunnies when they were clean and unused, or perhaps even pose them with the girls to up the cuteness factor.  Regardless, here is a photo of my daughter's bunny.
Hopefully you cannot see how dirty this toy is...
Chez Beeper Bebe has been so kind to blog about this project and you are able to print out a pattern and instructions.  So generous!  I didn't adapt this project much at all--it's already meant to be a way to recycle t-shirts.  I simply opted not to add the pom-pom tail because I needed the bunny to be more baby-friendly.  My daughter was a fan immediately and has spent a lot of time with those ears in her mouth.  Perhaps this bunny will get her through teething??

12 June 2013

pillow covers

This will be quite a short post because this is a pretty short project.  Basically if you have large enough t-shirts it's pretty easy to use the jersey like fabric and make pillows or pillow covers.  My inspiration was from the ducklings in a row tutorial on pillows made from men's button-down shirts.  Simple measurements and a quick run through the sewing machine is all it took, then I closed the pillows in with a slip stitch.  I wanted to do that properly so I followed directions from michelle patterns which were fabulous.  It buries the knot well which came naturally to me because it's a similar technique to what we do in surgery!

22 May 2013

dolman from man's t-shirt

I admit that before I saw this project I didn't even know what a dolman top was.  Of course I had seen the style before, but I had no idea what its name was.  I found this project at trash to couture and instantly knew what shirt I'd be modifying: one of my humongous band t-shirts that I've never been able to part with but never wear because it would be like wearing a tent.

This was what I would call my first "real" sewing project.  I made sure to watch the tutorial before starting so I wouldn't screw anything up.  Turns out this was really easy and I love the result, especially the new ruching at the bottom.  I think the 80's vibe of the dolman style works really well with this cheesy Weezer shirt.

Sorry for the craptastic selfie

18 April 2013

singlet from an old t-shirt

Let's be real about this...maybe you had a t-shirt that you really loved but one day you forgot to wear deodorant and you destroyed it.  No matter how many soaks in vinegar solution you do, that smell is in that fabric for life.  Sound familiar?  Hopefully not.  But if you made this mistake, like I did, then this project is perfect for you.  It's also a nice way to redo an oversized concert t-shirt.

crafterhours posted this tutorial on tee to tank.  Like the t-shirt necklaces, this is an incredibly easy sewing project.  You have the option for more sewing to provide refined edges, but I opted out since I was just getting back into the hang of sewing.  Plus I actually like the way cut jersey looks.  My advice for completing this project is to use a safety pin as your "needle" to thread the drawstring through.  Here's a look at the singlets I made:

Two lines of stitching, that's it!

09 April 2013

t-shirt repurposing=necklaces

The next few posts will be a bit outside the box.  I had a stack of old t-shirts that we were done with, but really weren't suitable for donation.  I decided that instead of throwing them away I should try to repurpose the fabric.  Pinterest was very helpful in pursuing projects, as were craft blogs.  I'm not a sewer, and hadn't used a sewing machine in 10 years when I started these projects!  So I started slow and my first go was with making t-shirt necklaces.

The tutorial is here.  The first necklace I made was hand-sewn, then the others were by machine.  These are ridiculously easy to make.  If your jersey is not as stretchy then the pieces don't curl around on themselves as well, but I like the different texture it gives the necklace.  These necklaces are perfect if you have a baby: they are soft, won't break and are washable!

19 March 2013

bokashi--part 2

Bokashi juice
Here's where we get down to the nitty gritty.  Above is some yummy yummy bokashi juice.  Make sure you read the preceding sentence with a lot of sarcasm.  This juice that comes out of the bottom of the bucket is loaded with beneficial bacteria and has a wide range of uses.  It's meant to reduce algae build up in your drains.  Diluted it acts like fertilizer.  I did dilute it and use it to help out my chilies and capsicum plants which were struggling and now they are all doing quite well and laden with peppers.  However, I think the juice smells like vomit.  I suppose that depends on what goes into the bucket and we tend to put mainly fruits and vegetables in which produce more liquid.  The bucket itself usually doesn't smell when I lift the lid and the bokashi has a sickly sweet smell to it.  The juice, though, is rank.  As long as I'm able to lift the bucket, I prefer to perch it over the edge of the sink and drain it straight in while I have the water running.

Ready to bury

In order to complete the last steps of breakdown, the fermented food needs to be buried in the soil.  When you go to bury the contents, you have to wait a week after the food at the top has been put in so it has a chance to ferment.  You can see in the picture how the food is covered in white mold, which means to process is working.  Green mold is another story, but fortunately that hasn't happened to us.  I reckon it all begins to look slightly yellow like it's pickling.  This is where I was crossing my fingers that everything worked like it should.  I was worried that our rocky, dusty soil wasn't even quality enough to complete the breakdown process.  Fortunately everything worked well.  I checked the soil about three weeks later and was having problems finding any evidence of food.  I started to think that maybe I had the wrong area of the garden, but I did come across an eggshell which hadn't broken down yet.  It's like magic!  My hope is that over time we will end up with quality soil throughout our garden.

Just needs to be covered in soil


13 March 2013

bokashi--part 1

Growing up in a family that composts, I feel a sense of guilt every time I throw away food at home.  Of course when you live in an apartment or a rental property, your options for compost are limited.  I had assumed that I would not do any composting until I owned a house and could lay out my own garden plan.  However a few months ago I looked at our waste and realized that a majority of it was food waste(!) so I decided to research my options.

The scheme that I found which would work best for my family's situation is the bokashi bucket.  This is not the stinky, hot composting you might be used to...it's a fermentation process.  This small bucket collects all your food waste, requiring little upkeep, then the contents get buried in your garden once the bucket is full.  It will take me a couple posts to relay all the info, but the super short conclusion is that I'm really happy with this system.  It's basically composting for the lazy.  The bucket can sit right there in the kitchen, collecting everything, and you barely have to do anything to keep it all running smoothly.

I was able to find a start up system at Bunnings Warehouse.  You need the bucket with its spigot at the bottom, a cup for draining the juice, and some active bokashi micro-organisms which come as either a spray or as granules.  We got it set up in a few minutes and started collecting food scraps.  This was my main selling point for this system--you can put ANY food in it.  Meat, citrus, cooked food, bread, whatever!  This is perfect for our family since we have two little ones that don't always finish their meals.

Upkeep consists of adding the micro-organisms after you add food, possibly squashing the contents down as the bucket fills, and draining the bokashi juice.  The juice doesn't start accumulating until a week or so after you've started using the bucket, but then it builds up every day.  When the bucket is full you bury the contents in the soil.  Honestly when you go to dig that hole in the garden, it feels like a leap of faith.  At that point the food doesn't look like it has done much to start on the breakdown process, but it all works!  The next post will have some photos to show what I'm talking about.

27 February 2013

natures organics

Perhaps most Australians are quite familiar with the earth choice line, or anything from the parent company natures organics, but I am new to them.  When I moved to Australia from the US I didn't know anything about the cleaning product brands here.  I went through trial and error trying to find things that worked well but didn't cost a lot of money.  Something about the earth choice packaging didn't grab me, and honestly I wasn't sure if natural products could clean as well.  Of course I should have thought back to my childhood of cleaning with vinegar, but apparently I like to shop with my eyes instead of my brain.

My first natures organics product I bought was actually kid's bubble bath.  How could I say no when it was the cheapest product by far and wasn't going to fill the tub full of funny chemicals?  Then I moved on to the earth choice laundry detergent.  Let me tell you, when I saw how syrupy the stuff was, I was worried.  But I'm very happy with it and have been able to use it for normal laundry, baby laundry, cloth nappies, anything.  My latest addition is the earth choice dish soap, and it seems to do the job although possibly not the best product for greasy things.  I will have to conduct an experiment in that regard, though, since I always wash the oily or greasy things last when the dishwater is rather spent.

Natures organics has a philosophy of trying to lower their impact on the environment and recognises that there are many things to balance in aiming to do so.  That's pretty much how I feel about any environmentally conscious decision I make.  I like that the company uses recycled packaging and bioplastic, has a palm oil policy, and is cruelty free.  In general now that I have tried a few different products and have been pleased with them, I am more likely to seek out the natures organics range when I need to get soap, body wash, shampoo, etc.  I think it might be time for me to seriously consider all the different products I rinse down the drain on a regular basis.  Health and beauty products could be a whole other kettle of fish, though, so stay tuned.

08 February 2013

buying local


The concept of buying local makes sense to me on a couple scales.  Shorter distances for the food in transit means less emissons.  Less shipping time should mean it's fresher, too, right?  You also have the ability to support the local community and smaller farms instead of large companies.

I assumed in buying local that I was going to have to start investigating my labels like crazy, ask shop keepers about origins of items and frequent farmer's markets.  In fact, we made one quick decision to utilise Aussie Farmers Direct and it's been heaps easier.  I don't have to question the origins of anything, they send you magazines where you can "meet" the farmers, and it's even easier for me since it's delivered to my door step.  Cost is slightly higher for some of the items, but many are very competitively priced.  The quality of everything has been overwhelming.  We are able to get fruit and vegetables which taste better and are nicer, and last for ages.  It turns out that one of my friends supplies the stone fruit for their fruit packs and I love that.  He says that he can't emphasise enough how good it is that the boxes are hand-packed.  That wasn't a selling point for me, but he knows the fruit business better than I do!

We get a fruit and vegetable pack delivered fortnightly.  When I tell friends about this service, the fact that I don't choose what's in the box seems to deter quite a few of them.  I admit that it took a bit of getting used to, but I barely even notice it now.  It actually really helped us get out of the rut of buying the same vegetables all the time, got us to try new recipes and forced us to only eat produce that is in season.

This topic of buying local will be continued at some point...the rest is a work in progress as I try to sort out which shops are best to get other items.  The "Made in Australia from local and imported ingredients" label irks me to no end...I would really be happy to see some eco-labelling environmental policy tools in action.  Anyone else feel that way?

29 January 2013

toothbrushes

I'm one of those never-throw-the-toothbrush-out kind of people.  When I'm done with them, they all go to the cleaning cupboard to be tiny scrub brushes.  One time in high school I even made one into a bracelet.  However, I cannot even recall the last time I decided I was going to clean something so thoroughly that I used a toothbrush to do so!  Seeing as I'm not so good on the reusing front, and in general I'd like to lower my use of plastics (especially ones that aren't readily/obviously recyclable), maybe an alternative toothbrush would suit me.  My husband found these, actually: the environmental toothbrush.

A dentist in Brisbane invented this toothbrush, which is made of bamboo.  They're a bit basic, but last well and do the job just fine.  Another bonus is the low cost.  But I must say that as soon as I started using them I realised how many "comfort" design features regular toothbrushes have.  Flexible neck, contoured head, etc...this brush does not have that.  But I found out that although it was noticeable at first, in the long run I didn't care.